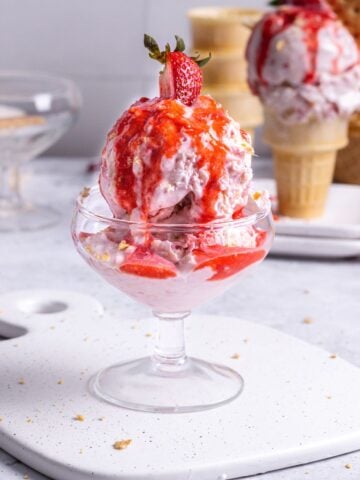
Creamy Biscoff Cookie Butter Ice Cream
If you love Lotus Biscoff cookies, this homemade creamy cookie butter ice cream is about to become a little obsession. This is the kind of dessert that mysteriously disappears from the freezer overnight. Totally not speaking from experience here. Tehe.
This no-churn cookie butter ice cream is rich, velvety, loaded with warm spiced cookie butter flavor, and packed with crunchy Biscoff cookie bits in every bite. Even better, you don't need an ice cream machine, custard, or fancy techniques.
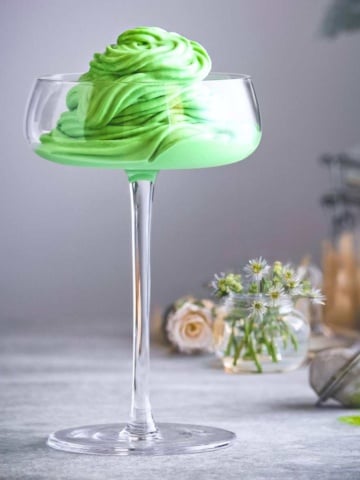
If you love biscoff spread, my Lotus biscoff cake and biscoff milkshake are a good place to start.

Jump to:
The tiny bit of coffee in this recipe does not make it taste like coffee ice cream. Promise. It simply deepens the caramelized cookie flavor and beautifully balances the sweetness.
This homemade Biscoff ice cream tastes like something you'd get from one of those trendy little dessert shops, but pricier. Thankfully, this version is way easier on the wallet. And yes, your kids will absolutely hover around the freezer asking for "just a tiny scoop" every 14 minutes.
Why You'll Love This Cookie Butter Ice Cream
- No ice cream maker needed.
- Rich, creamy, scoopable texture without it turning icy.
- It is packed with warm spiced Biscoff cookie flavor.
- You are guaranteed crunchy cookie pieces and swirls in every bite.
- The whipped cream keeps it light and fluffy, while the condensed milk helps create that smooth, no-churn texture we all love.
- A tiny bit of coffee deepens the caramelized flavor without making it taste like coffee ice cream.
- It is easy to make ahead for summer parties, holidays, or random weeknight freezer cravings.

What is Biscoff?
Biscoff cookies are those crispy, caramelized, spiced cookies usually handed out on airplanes. They have a warm cinnamon-caramel flavor that works ridiculously well in desserts.
The cookies are also blended into the famous creamy cookie butter spread used in this recipe.

What is Cookie Butter Spread?
Cookie butter is a smooth spread made from crushed spiced cookies, sugar, and oils. Think peanut butter texture, but with sweet buttery cookie flavor instead.
Lotus Biscoff spread is the most popular version, but Trader Joe's cookie butter works great too.
Ingredients for Homemade Cookie Butter Ice Cream
Here is what you'll need to bring this ice cream to life:

- Heavy cream: This gives the ice cream its luscious, fluffy, creamy texture. Make sure it's very cold before whipping.
- Condensed milk: I love to use condensed milk instead of granulated sugar. It leaves the ice cream with a smooth texture and no sugar granules to worry about.
- Biscoff cookies: For crunch, texture, and tiny cookie surprises throughout the ice cream. My kids look forward to the chunky bits.
- Cookie butter: The star of the show. Use creamy cookie butter for smooth swirls throughout the ice cream. Lotus Biscoff spread works beautifully, but Trader Joe's cookie butter works too.
- Instant Coffee: We will be using a tiny bit. The coffee deepens the warm caramelized flavor without making the ice cream taste like coffee ice cream.
- Salt: shocked? I know! In addition to taste, salt helps the ice cream freeze correctly by lowering the melting point. A generous pinch is all you need.
Here is how you make it:
Detailed instructions are outlined in the recipe card below, but here are a few steps with visuals to guide you:


- First, combine coffee with hot water. Set aside to cool completely
- Melt the Biscoff butter in a microwave-safe bowl.


- Whip the heavy cream in a bowl until medium peaks form.
- Combine the biscoff butter, condensed milk, and coffee in a bowl until it's fully incorporated.
- Gently fold the biscoff butter mixture into the whipped cream mixture.


- Crumble some biscoff cookies and set them aside.
- Transfer the cream mixture into a freezer-safe container. Layered with biscoff crumbles.


- Make a swirl at the top, then freeze.
- Scoop into serving cups. Garnish and enjoy!
Ways to Serve Cookie Butter Ice Cream
This ice cream is great on its own, but here are a few fun ideas:
- Scoop it into waffle cones or serve it over my cottage cheese waffles.
- Sandwich it between cookies. It will be a hit with my coconut pecan cookies
- Serve it over warm brownies
- Add caramel drizzle and crushed pretzels
- Blend it into milkshakes as I did with my lotus milkshake
- Top with extra melted cookie butter
- Pair it with espresso for an easy affogato moment

Tips for Creamy No-Churn Cookie Butter Ice Cream
- Chill your mixing bowl before whipping the cream. It helps the cream whip faster and hold better volume.
- Slightly warm the cookie butter before mixing if it feels too thick. About 10 seconds in the microwave is enough.
- Gently fold the biscoff butter mixture into the whipped cream mixture ⅓ cup at a time, making sure NOT to mix but FOLD. This will prevent the cream from deflating and losing all the whisked air you beat into it.
- Fold in the crushed cookies near the end so they stay crunchy.
- Let the ice cream sit at room temperature for 5-10 minutes before scooping.
- Store the ice cream in a shallow container with plastic wrap pressed directly on top to help prevent ice crystals.

Recipe FAQS
Churned ice cream is mixed in an ice cream machine, which adds air and creates a smooth, creamy texture. The process usually takes about 15-20 minutes.
No-churn ice cream skips the machine completely. Instead, whipped cream is folded into the other ingredients by hand for an easy, homemade version with a rich, creamy texture.
Usually, the mixture wasn't folded gently enough, stored properly, or frozen with too much air exposure. Sweetened condensed milk also helps prevent iciness in no-churn recipes, and shouldn't be substituted in this recipe.
Yes! This recipe is completely no-churn, so no ice cream maker is needed.
For the best creamy texture and flavor, enjoy it within 2 weeks. Though honestly, it rarely survives that long around here.
Definitely. Crushed pretzels, caramel swirls, chocolate chunks, or extra Biscoff cookies all work really well.
Store the butter ice cream in a freezer-safe container covered with a lid or cling film.
Store for up to 4 weeks, preferably 2 weeks, for fresh-tasting ice cream and minimal ice crystals.
More Cold Treat Recipes to Try:

Have you given this recipe or any other from my website a try? Please consider leaving a ⭐ star rating and sharing your experience in the 📝 comments section. Your feedback means the world to me, and I'm excited to hear from you!
PEACE & LOVE
Maureen
This post contains affiliate links. That means if you purchase after clicking on a link, I may earn a small commission at no extra cost. Thanks for your continuous support.
📖 Recipe

Cookie Butter Ice Cream
Equipment
Ingredients
- ½ cup biscoff butter
- 2 tablespoons instant coffee granules (or 1 teaspoon espresso)
- 4 .oz hot water
- 1¾ condensed milk ( from a 14 .oz tin) 397g
- 2 cups heavy cream, chilled
- 12 biscoff biscuits, broken
- pinch of salt
Instructions
- Combine coffee in hot water. Set aside to cool completely
- Place the Biscoff butter in a microwave-safe bowl, and heat at 30-second intervals until it's easily stirred. (This should take about 45 seconds, depending on your microwave). Set aside.
- Place the heavy cream in the bowl of a stand mixer fitted with the whisk attachment or in a large bowl using a hand mixer. Whip the cream on medium-high for about 3 minutes or until medium peaks form.
- Meanwhile, combine the biscoff butter with condensed milk in another bowl until combined. Slowly stir in the coffee, and continue to mix until it's fully incorporated.
- Gently Fold in the biscoff butter mixture into the whipped cream mixture ⅓ cup at a time making sure not to mix but fold. Repeat the step until there is no mix left.
- Transfer the cream mixture into a square loaf pan or any freezer-safe container one cup at a time. Add the biscoff crumbles interchangeably as you add the cream mixture.
- Using the tip of a knife or skewer, make a swirl into the base of ice cream until you reach your desired look. (Optional)
- Cover and freeze for 4 hours or overnight.
- If stored with plastic wrap. Be sure to press down the cling film to touch the top of the ice cream, this will help prevent freezer burn and crystals.
- Remove the ice cream from the freezer at least 3-5 minutes before serving for an easy scoop.
- Scoop ice cream into individual serving cups. Top with Biscoff butter and biscoff crumbles. Serve immediately. Freeze any leftovers.
Video
Notes
- Add the biscoff bits in layers instead of mixing them with the cream. This way they won't get soggy before freezing.
- Gently Fold in the biscoff butter mixture into the whipped cream mixture ⅓ cup at a time making sure NOT to mix but FOLD. This will prevent the cream from deflating and losing all the whisked air that you beat into it.
- Remove the ice cream from the freezer at least 3-5 minutes before serving for an easy scoop.
- If you'll be covering the ice cream container with plastic wrap. Be sure to press down the cling film to touch the top of the ice cream, this will help prevent freezer burn and crystals.
This was delicious. Love your instructions. Very helpful.
So happy to hear! Thanks for tagging me on IG, I love to see it
Amazing recipe Maureen! everyone loved it
Omgosh❣️ I've made this twice now and now I'm addicted... Yup it's true, the place down the street charges 7.00 for 2 scoops, cookie butter, but this is as good or better and fresh.. DELICIOUS and EASY. Thanks so much for sharing .
FYI..Freeze your loaf pan, whip cream bowl and whipping beaters,speeds up whipping process.
Hi Warren!
That makes me so happy that the recipe worked out for you! Isn't it such a money saver?! Yes, freezing the pan and whipping equipment does speed up the freezing process. Thanks for the helpful tips and for sharing your success with the recipe. Enjoy!